
Airsoft Electric Guns - a great way to get an automatic firing airsoft gun in an efficient manner. Although simple in nature, the mechbox, the powerplant of the AEG (Airsoft Eletric Gun), is more complicated than one would imagine. Opening the mechbox is probably the single most complicated experience with airsoft guns. AEG users, especially the beginners, are normally turned off by opening the gearbox for fear of damaging the internals of their gun or rifle. Therefore they would rather turn to experts who know the innards of the gearbox. This however can get pricey and the hassle of shipping and receiveing the gun is not worth it. In the following article, the gearbox of an Automatic Electric Gun will be opened to help those who would like to do their own mechbox upgrade.
Airsoft Tools: (As shown in the image below)
- small phillips screwdriver
- flathead screwdrivers
- lubrication (Silicon Gel)
- white lithium grease (or Oil Silicon Spray)
- No.10 Torx driver
- razor blade
- rag (to wipe out hands)
- clean surface to work on

Version 2 and 3 Gear Box note: Most airsoft electric guns come with version 2 or 3
Competely take the airsoft gun down in order to facilitate the removal of the gearbox from the AEG's body. This process normally involves taking the pistol grip down as well as a few pins, other miscellaneous parts and sometimes the stock. Take note of the several distinct sections of the gearbox when it is being opened to avoid having the spring guide inside from flying off.
Take note that different manufactureres such as Classic Army (CA), ICS, TM and Tokyo Marui have different designs for each mechboxes. The gearbox has two different sections, the upper and the lower halves. The upper half is slightly wider than the rest of the rifle's mechbox parts. It has a long brass cylinder as well as a small plastic piece protruding from the nozzle, as shown in the image below. This section is houses the gearbox's cylinder, piston, and the spring's assembly. This is also where the compression takes place allowing the airsoft gun to fire at velocities of about 280 fps (feet per second). As the rifle's trigger is pulled, the gears is spun by the AEG motor pulling the piston back against the weight and pressure of the spring. The piston is then released with the full strength of the spring when the gears reach the end of the piston's teeth. Then, it shoots forward compressing the air. This air then channels through the cylinder and the air nozzle pushing the 0.2g BB pellets through the barrel and out of the automatic electric gun.
The lower section of the automatic electric airsoft gearbox contains the trigger. Depending on which AEG brand (CA, ICS, AE, or TM), this lower gearbox part is flat and has a small, metal/nylon bushings sticking out from the center of the gear. It is the home of the electrical equipment as well as the three gears that make the gun run. Depending on the how is gearbox made, there will be wirings protruding either either on the trigger unit or the back of the gearbox. The wires at the bottom of the gearbox is what will supply the power to the motor.
When the trigger of the automatic electric rifle is pulled, it sends small contacts inside the trigger unit feeding electricity to the selector plate from the battery. It then goes to the motor engaging the gears inside. The piston is pulled back releasing it against the pressure of the spring and causing it to compress and shoot the BB through the barrel. If the electrical wirings are pulled and/or loosened, the AEG will obviously either work sporadically or not shoot at all since it is not getting its power supply from the battery.
Airsoft Gearbox Takedown: The following is the separation automatic electric gun's gearbox.
- Unscrew the 4 phillips screws on the mechbox and remember where each go. (NOTE: Also remember where all the 8 screws holding the mechbox together are placed. They differ in lengths and some have washers).
- Take the 4 torx screws out. The screws are marked with Xs in the left image below. The screws should be removed so that the first one taken out is from the nozzle, and the last one from back of the gearbox. (NOTE: The back is where the spring pressure is the greatest).
- Keep the two halves pressed together until it is SAFE and READY to split gearbox apart since there is always pressure the whole time it is assembled.
- When all the screws are removed, it is not ready to takedown the gearbox. It still needs to be carfully separated in half.
- Take a flathead screwdriver and locate the trigger and the motor opening. The gap in between will be used to initiate the separation. Place the screwdriver in the separation.
- When the two halves begin to separate, take a small screwdriver and insert it into the whole in the back of the gearbox. This is the spring guide.
- Push down on the front of the screwdriver once the screwdriver is in keeping the spring guide in check while the mechbox is being opened
- With some help, try to press down on the top of the cylinder.
- Before opening the gearbox, take a thin piece of wire and reach through the motor hole. Try to pull the anti-reversal latch off of the bevel gear. This will allow the internals to come to a resting position.
- Proceed with the separation of the gearbox. (NOTE: there is a point where popping sounds will be heard. This is the sound of the gearbox internals separating).
.jpg)
At this point, the gearbox of the automatic electric airsoft gun is now opened. This is the point where tune ups or upgrades can be performed if necessary. If doing so, it is recommended to purchase a good tune-up kit such as a Systema MP5 Full Tune Up Kit if working with an MP5 to save the hassle of purchasing small items separately. The following are the internal parts of the mechbox as well as a brief description each.
Shims: This is the most overlooked part of the gearbox. Extra care should be taken into account when handling this part. This small metal washers serve as devices to evenly space the gears and the bushings. Shims come in various sizes making it easy for users to gauge how many to use in between the gears and the bushings. Not enough shims causes stripped gears due to too many points of contact. On the other hand, too many shims can cause lockup due to the tight space it creates between the gears and the bushings. Take note that it is necessary to re-shim the gearbox when the gears, bushings, and/or the mechbox shell need to be replaced.
Be mindful of the shims as the gearbox is being popped opened because, as mentioned earlier, they are thin and tiny. Once the top half of the gearbox is opened, they will either stay on the axles, come off the bushings, or pop off inside the mechbox. Inspect any of them in the top of the three bushings. The bushings are the three pieces of plastic that fit into the axle and inside of the spin. They are in both halves of the gearbox shown in the right image below. It is sometimes hard to inspect for the shims in the bushings since they can look exactly like a part of the three bushings' surfaces. Also carefully examine any shims that may have fallen out of the mechbox. If any are found, place them back on the the axel where they belong.
Tappet Plate: Attached to the air nozzle, the tappet is a long black piece of plastic containing an "arm" near the back. It engages the sector gear and the semi-circle slot located in the front where the air nozzle fits into. When removing the tappet plate, take a note that there is a small spring on the bottom, near the middle. Take extra care with this spring when taken out for if it gets lost, the tappet will not function correctly when the gun is shot.
Spring: The spring will now be removed. Gently lift up on the spring guide where the screwdriver is inserted into. It will rise straight up. Allow the spring to relax while lifting to relieve any pressure in the mechbox. As shown in the left image below the spring is still intact having its spring guide lifted out. Gently remove the spring out as well as piston from the inside of the cylinder. They are both attached to each other. Place them aside and pull the cylinder/tappet out. On the tappet plate, there is a spring that maintans the resistance. This spring needs to be removed. Keeping a finger on top fo the spring, lift it off the metal post on the gearbox using a small driver. When the spring is out, pull up on the cylincer and rotate the top of it to take out the entire cylinder and tappet plate assembly. Now place them aside with the spring/cylinder assembly that was just taken out.

The Gears: The three gears propelling the mechanical force of the automatic electric airsoft guns will now be discussed. There are three of them which are the sector gear, the bevel gear, and the spur gear.
The sector gear: This gear creates the final amount of necessary torque to pull the spring back. It contains large and clearly defined teeth that directly engages the piston as well as a small rack on the underside which also engages the spur gear. To get a better picture, scroll down in the images below. The sector gear also has a small nub on the inside of the first larger rack that works with the tappet plate allowing it to function. It also has a small oval-shaped nub under the gear that engages the cut-off lever. It is a necessity to retain the proper semi-auto function.
The bevel gear: This gear contains three set of teeth in it. The first set is the long-circular rack of teeth that directly engages with the motor creating the initial step in increasing the torque. The second set is the "spur-ish" teeth that engage with the spur gear. Lastly, the wave-like teeth that engages the anti-reversal latch. This gear is placed in the right-half wall of the mechbox with the large, flat, circular side up.
The spur gear: This gear contains two sets of teeth. The larger of the two directly engages the bevel gear. The smaller one engages the uderside of the sector gear. The large flat-side rests against the left-half wall of the mechbox.
With the basic details about the gears as well as the other small parts of the gearbox, it is now ready to further take the mechbox down. Starting with the bevel gear. Upon lifting it, look for any shims that may be on the bushings underneath it. Remember to keep the shims on the gears. Once the gear is lifted, the anti-reversal latch is underneath the bevel gear. Take note how this and the spring guide are placed to make it easy when putting things back together. Now, lift out the sector gear which is the topmost gear. Look for shims around the bushing and place them where they belong. Finally, lift the spur gear out. As mentioned above, this is the gear that transfers power from the motor to the piston. Again, keep a lookout for shims.

The Bushings: These may be one of the easily forgotten parts of the gearbox. They are circular nylon/metal pieces containing small holes in them. The axles of the gears are kept in place by these small holes. They are of great importance because they prevent stress and friction when the gears turn.
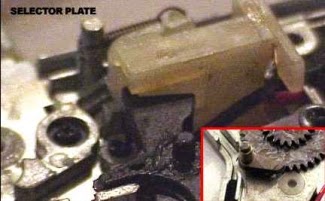
The Selector Plate: This is what controls the different firing modes of the gun. In Verions 2 or Version 3 gearbox, this is located outside. It pushes on contact in the middle of the gearbox. It also determines whether the cut-off lever works properly or not depending on its location.
The selector plate is physically repostioned depending on the selected mode. On the safe mode, the selector plate is not in contact with any gears. It engages a small lever that controls the safety lever controlling the trigger assembly. It blocks the trigger and preventing the gun to shoot. On the semi mode, the selector plate positions the cut off lever. It engages with the sector gear for each shot is makes. Finally, on the full-auto mode, the cut-off lever is positioned so that it cannot be engaged. This allows the gun to shoot continuous 0.2g BB pellets while holding the trigger.
Take the bushings out from the lower half. It is still possible to lift the bushings out of the gun even if the selector plate on the back of the mechbox stops from getting to one of the bushings. This is possible by holding the remaining components in place, especially the trigger mechanism and pull out the bushings. Sometime, the bushings may not be accessible so further disassembling may be needed from the back side to reach the busnings.
Looking at the bottom half of the gearbox, by the location of the selector plateking the spring out. Although it is easy to remove, be careful since it is very small. To do so, place a finger to prevent it from flying off. Then with a small screwdriver, pull back on one of the ends. Rotate the gearbox halfway over in order to see the inside part of it. A screw holding the black lever is in place. Looking at the right image below, this screw is located on the right. Screw it out and pry off the top arm. Take a note of how the spring is placed and lift it out. Pull the lever out from the bottom side. Now, the metal lever that the spring was pressing against needs to be removed. To do so, remove the single screw that is holding the metal down. On the picture below, it is the screw on the left side. The lever is fitted in there fairly well, so it may be somewhat difficult to take it out just keep a finger on the trigger assembly when the metal lever is being removed. Flip the gearbox once again in order to slide the selector plate out.
Sliding out the selector plate clears up some space for bushings. It is now ready to remove them. Take a screwdriver that fits the hole of the bushings and push on the from the bottom. Be sure to hold onto the trigger mechanism because it may come undone.

At this point all of the internals of the gearbox have been taken down. The pistons will now be discussed
The Piston: The piston's body comprises of small teeth that engages the sector gear. The sector gear is what pulls back against the tension of the spring. There is also a reinforced metal tooth that stresses from the spring as the gears disengage the teeth. This allows the firing of the pistion. Also, there are guide rails on the side of the piston that fits onto the small rail on the wall of the gearbox keeping the piston's teeth in place. The piston is directly coupled with the piston head, although it does not however have anything to do with the compressed air.
The Piston Head: This part is the third part that couples with the cylinder for compression. The head is screwed to the front of the piston with a bolt. It catches a metal spacer inside, holding the spring down. It also keeps it from wobbling. The piston head may be several small holes on the front side depending on whether it is a stock or upgraded. Air goes in through these holes and helps enlard the o-ring on the piston head to fully engage the wall of the cynlinder.
The piston head is covered in plastic with the screw inside. When unscrewing it, first take a sharp tool such as a cutter and carve the out center of the piston to avoid ruining the round shape of the piston head (as shown in the right image below). Once the screw is visible, it is now ready to unscrew the piston head from the piston. The O-ring of behind the piston head will come loose fast. It is fine to leave the ring clinging on the head. When the piston head is free from the piston, the spring can now be pulled right out of the piston body.
Reassembly at this point can now begin. Wipe all the grease off the O-ring and the piston head first. Then, reattach the piston head to the piston. The metal spacer is then reinserted back. There is a metal nub sticking out of it that goes into the hole inside the piston. Line up this nub, insert the metal spacer, and screw it in until it is in the hole. Get the old spring and insert the flat end back into the position. Tightly screw the piston head back on. Take the old spring out and replace it with a new one containing a plastic washer. Now, it is possible to place the spring assembly to the side once again.
.jpg)
With the bottom half of the airsoft gearbox, place the selector plate back on by inserting it into the slot where it belongs. Reattach the bevel gear using the steps above in the reverse order. Install the bottom half of the lever from the bottom. Put the spring on, put the top-half back on and screw it back in. Put the black lever back on and reinstall the metal arm. Place the small spring back in place on the selector plate.
Flip the mechbox over. Wipe off any remaining grease that may have been in the place where the gears go as well as in the piston groove. Then, insert the metal bushings in to the three holes. Gently push them back in using the hands only. Avoid warping or bending of the inner rim of the bushings in any way, if possible. The gears are now ready to be placed back in. Start with the spur gear. With some white lithium grease, apply some to the shim and the axle itself, as well as the bushing opening. Shown in the left image below, the white lithium grease or Oil Silicon Spray is being applied. Once applied, the gear should turn and rotate easily. The bevel gear is next to be put on. Clean off the grease from the old anti-reversal latch and apply a new coat. Then, reinsert it into its receptacle making sure the spring is positioned correctly. If needed, wipe off the old grease from the spur gear and apply a new coat as well. Next, apply some white lithium onto the bushings and the gear axle and put it back into place so that it meshes with the spur gear.
At this point, it is possible to turn the bevel gear freely in the counterclockwise direction. This will turn the spur gear as well. Turning the gear in the opposite direction should cause the gears to stop turning when it hits the anti-reversal latch. Turn the bevel gear until it halts, then leave the gear in that position. Apply some Silicon Gel and insert the sector gear.
.jpg)
The cylinder can now go back in using the opposite motion that was used to remove it. Reattach the spring back once in place. The tip of the tappet should rest up against the axle of the sector gear. Put some lube gel around the head of the piston making sure to hit the whole O-ring. Also, apply some to the 2 grooves along the side of the piston. Insert the piston back into the cylinder with the new spring in place making sure that they line up with the grooves in the gearbox properly. Note that springs are tightly coiled at one end. This is the end where the piston goes in. DO NOT compress the spring and put the spring guide in place yet.
Test out the compression of the cylinder by putting a finger over the nozzle end, pull the piston out until the piston head is just inside the cylinder, then try to push the piston back in. Its head should form a tight seal with the cylinder and the piston should not push all the way forward with the finger in the nozzle. If it can move forward easily, check the piston head to make sure it is correctly reassembled. Also check to make sure that the nozzle moves as well when the tapped is moved. The tappet plate locks into the nozzle. Although if it becomes separated, the gearbox can be reassemble still but the BBs cannot be chambered correctly when the gun is fired.
Here is one suggestion to facilitate the reassembly. Apply white lihium (or Oil Silicon Spray) to the tops of the axel of the gears and place the metal bushings on remembering to put them on so that the wider side is at the bottom. This will greatly facilitate the placement of the top half of the gearbox back on. Make sure the bushing on the sector gear is on TOP of the arm of the tappet plate. The image on the right hand below shows how the bushings should look like when it it back on.
Wipe the top half of the gearbox and wipe the grease off. Then, apply new grease in the groove of the piston as well as a small amount on top of the anti-reversal latch.

Airsoft Rifle Gearbox Reassembly: Here, reassembly takes place. Start with the compression of the spring and the reinsertion of the spring guide back into position. The piston should be placed all the way inside of the cylinder. The spring guide contains 2 tabs on the behind it. Each goes directly up and down into the airsoft gearbox halves. Reinsert the screwdriver back into the spring guide, and with some help, apply pressure in the same manner that was done when taking the gearbox apart. Start to place the top half of the mechbox back onto the bottom half. When both are aligned, use a finger to go through the opening of the cylinder of the gearbox and hold it in position. Then, further secure the top half into position.
Here are 5 things to look for when performing this task:
- Each of the three bushings must be centered in their holes
- The anti-reversal latch must go into its hole
- The black lever (which is the safety for the airsoft guns) must actually be inside the mechbox. Due to the spring tension on that lever, it may be rotated down some, stopping the mechbox halves from meeting. Try to fully close the front (nozzle end) of the gearbox first. Check the black safety lever, and make sure it is pushed up inside the it.
- Check each of the bushings and adjust them slightly so that they are in their holes. Use a screwdriver to do so.
- If necessary, move the anti-reversal latch a bit in order to get it into its proper place.
Troubleshooting: Check to see if there are any gaps in between the halves of the gearbox. This is a sign that it is not fully closed. If so follow these directions:
1. Anti-reversal latch
2. Each of the gear bushings
3. The black safety lever.
If the first three is fine, reopen the mechbox and upon reapplying pressure with the screwdriver in the spring guide, look for:
4. The trigger assembly - make sure it is laying flat.
5. The tappet plate arm - make sure it is under the sector gear bushing
6. The cylinder head - there is a hole in the head that part of the mechbox where it goes into.
7. Spring guide - make sure the tab is facing straight up.
8. Bushings - make sure they are all of the way down.
Then, make sure that the wider end of the bushing is down. Reattempt to seat the top half upon going down this checklist. Then, disassemble the gears if it does not work and start over. When everything is good, reinstall all the 8 screws in the order they were removed. Starting out with the 4 Torx screws first. Check the trigger and see that it is able to pull just as if it was back in the rifle. Slide the selector plate on the backside of the mechbox. The gun would get into the safety mode disengaging the trigger.
When all of these steps are correctly followed, this will ensure a proper management of the automatic electric gun mechbox.


0 komentar :
Posting Komentar